
So here we go.
Another piece in my How to Ollie series, but this time we are tackling the timing on an Ollie. This is something that a lot of beginners don’t really understand and it can be difficult. So I’m going to break it down with a graph and hopefully make this as simple as possible for you.
Let’s get started.
The Timing of an Ollie
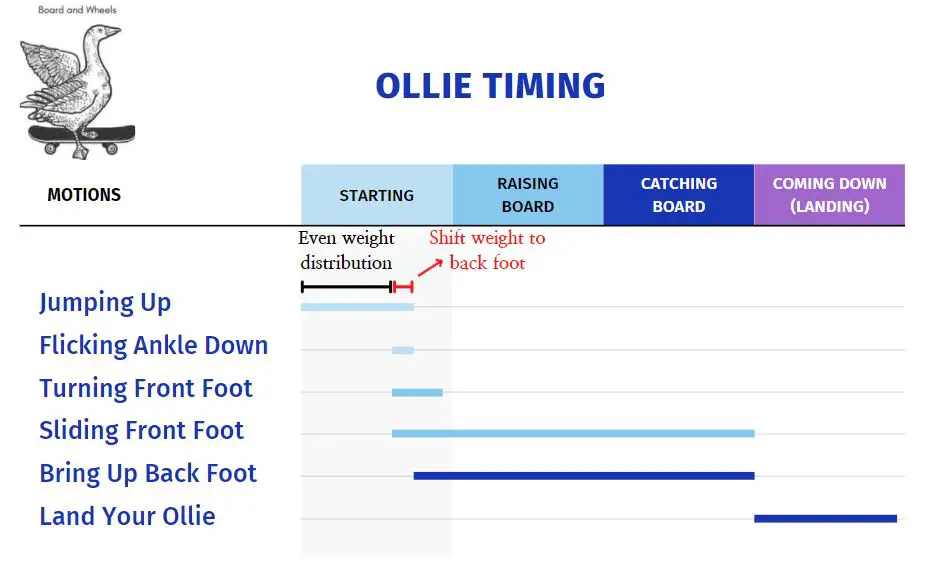
So this image looks like something I made in Powerpoint because I actually did make it in Powerpoint. But the information is still important.
The key parts are in the early part of the ollie. When you start to jump and when you shift a little weight to your back foot to help flick your ankle is critical. So notice that many parts overlap as well. This is something to keep in mind as different parts of your body will be doing different motions at the same time. I told you an ollie is tough.
This usually means you focus on one aspect at a time and then hope muscle memory takes care of the other parts. This is the way forward, but it can be slow training your body to do something like this.
Weight Distribution Before You Pop Your Ollie
This is a bit complicated to explain, so I decided to make a whole section dedicated to this.
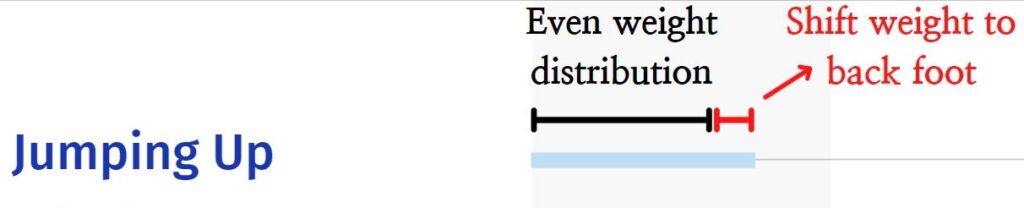
Some people have an issue with distributing their weight as they jump up for their ollie. This causes them to shift their weight to the back tail and then jump off the tail when it comes to the ground. This kills all pop and makes it difficult to ollie and impossible to ollie cleanly.
The trick here is to keep an even weight distribution as you start to jump and come up, but shifting weight to your back foot only at the last possible second. This way you are already jumping up when you shift your weight and you can use the weight shift to help flick your ankle. You will then snap the board down with a nice motion as you come up from your earlier jump.
Your foot will have left the board before the tail touches the ground. This is key. Most ollie tutorials focus on the motions of the ollie and don’t really mention the weight distribution and weight shift that happens.
If you think skateboarding is hard, you’re right. Check out why skateboarding is the hardest hobby and why the learning curve is so steep.
The Parts of an Ollie
The ollie is thought to be a simple trick, but actually, it is really a complex set of motions. There really isn’t anything easy about it unless you’ve practiced it 1,000 different times.
There are some key motions to be aware of that have slightly different timing and duration. Don’t get overwhelmed by all of these because once you learn the motion, you will never think of an ollie in parts again. This is just to help those of you who are stuck.
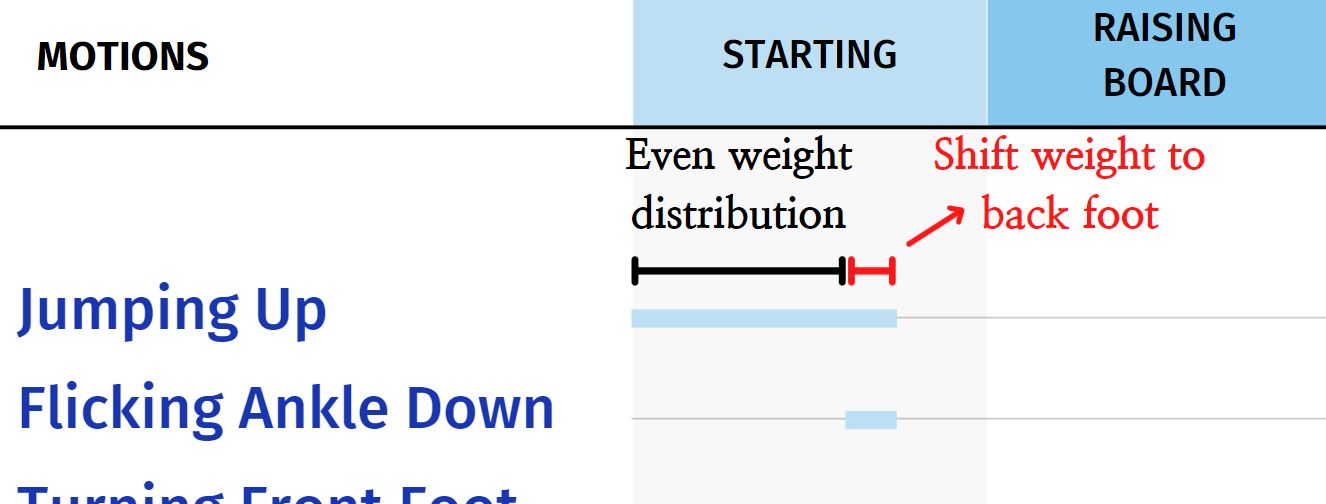
Jumping Up
At the very onset of the ollie, you start to jump up.
This means you mean to straighten your legs from a crouching position and explosively move upward. The jumping motion doesn’t end until both of your feet come up from the board. However, before you bring your back foot off the board, you will do one more motion.
You will flick your ankle down.
Flicking Your Ankle Down
Flicking your ankle down happens right before your back foot leaves the board from jumping up.
The purpose of this ankle flick is to “pop” your back tail against the ground so that the front of the board pops up. Once the front of the board pops up, you can catch it with your front foot and do an ollie.
This set is very brief but is so important. Commonly beginners won’t flick their ankle at all and actually jump from their back foot after shifting their weight to it and bringing their back tail down. This kills all pop. You should be jumping up from both feet but with just a bit more pressure on your back foot at the last moment.
Turning Your Front Foot
The moment you jump up, you will start to turn your front foot and bring it up.
This will start to happen before the back tail of the board makes contact with the ground. Your front foot should be turned so that it can catch the board with the side of your foot.
This motion is simply rolling your ankle. You can practice do this without pop first so the motion becomes a bit more natural. For heavier or older people, this can be scary to deliberately “roll” your ankle, but you need to if you want to catch your board.
Sliding Your Front Foot Up and Forward
At this point, refer back to the Gantt timing chart I made if you get confused.
Sliding your front foot up begins as you start turning your front foot right after jumping upwards.
Sliding your front foot up and forward will continue until your board levels out and you catch it with your back foot. At that point, the ollie is essentially finished and you will just fall back down for your landing. So we could say once you begin turning and sliding your front foot, you will continue this motion until you finish the ollie.
Bringing Up Your Back Foot
You will also bring up your back foot so that your ollie can level out nicely and you can get good height with your ollie.
You will begin to bring up your back foot as you flick down with your ankle. So this begins at the very end of your jumping motion. Your front foot will come up just before your back foot, but it shouldn’t be far behind.
If you want to focus on doing a higher ollie, then check out this specific visual guide that explains what makes an ollie high and tips on how to add height to your ollie.
Additional Questions
Are You Supposed to Jump When You Ollie?
An ollie refers to bringing your board up off of the ground by popping the tail and sliding your front foot up. But do you actually jump when you ollie?
During an ollie, you are supposed to jump so that you can get maximum height for your ollie and to help snap the board’s tail to the ground. If you don’t jump for an ollie, you might get off of the ground but the ollie will not be very high. Start your ollie jump with the weight evenly distributed between both feet and only shift weight to your back foot at the last second to help snap your tail.
This point is a bit tricky for beginners and hard for experienced skaters to teach because they don’t think about it. Just know that the higher you can jump normally, the higher you can get your ollies.
Maybe it’s time to start hitting the gym.
Conclusion
So that’s it.
The ollie’s timing is complicated but can be understood if you stare at slow-mo videos and graphs long enough. Hopefully, this helped you break down what one of your ollie issues is. I say “issues” here because learning a new trick just involves fixing many little mistakes until you can land the trick cleanly.
It is likely that you are doing a few things wrong when you try to ollie. Luckily, understanding the proper form is half the battle.
Anyway, thanks for reading, and look out for more content from Board and Wheels.
Sources
I have other guides about doing an ollie meant to specifically answer different aspects that might be helpful for you. You can see my list of ollie articles below:
- How Long Does It Take to Learn to Ollie With Data
- How to Ollie While Moving- A Visual Guide
- How to Ollie While Moving Common Problems and Solutions
- How to Ollie and Skate a Curb- A Visual Guide
- How to Stop Turning While Doing an Ollie- A Visual Guide
- How to Ollie Over an Obstacle
Otherwise, learning how to ollie takes a lot of time and dedication. It can also help to get other perspectives and see other guides so you can get a really solid understanding of how the ollie works. You can also learn different tips and potentially find one that really helps things “click” for you.
Below are some great guides that I think are strong in different aspects. Check them out:
